This Guide relates to the Legacy implementation of Salesforce integration, which has now been superceded. This guide has been left live for those users still using the legacy integration. For information about the new version of Salesforce Integration see https://help.smartsurvey.co.uk/article/integrating-smartsurvey-with-salesforce
Before we get started, it needs to be understood that Salesforce is highly configurable and customisable, so we will need to speak in general terms, as far as the Salesforce side. We make no assumptions about how the reader has set up Salesforce, and this guide assumes the reader is familiar with their own Salesforce instance configuration.
To start, open the survey you want to integrate by selecting it from the dashboard or My Surveys page.
You then need to access the survey settings by clicking "settings" from the white bar on the survey design page.
From this page, choose Integrations from the nav on the left.
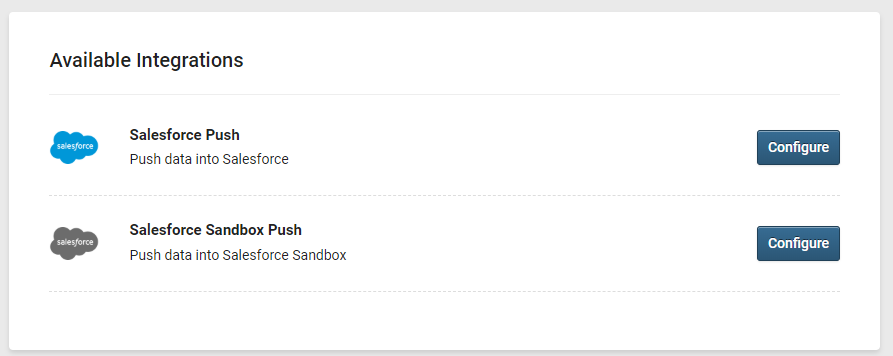
On this page, you will find the options to create a new push integration for the survey. This can be either to a Live Salesforce Org or a Salesforce Sandbox.
Each push integration can only target one object in Salesforce. If you need to push data from a single survey into multiple objects, you’ll need to create a new integration for each object. You can create as many integrations per survey as you need.
If a survey has multiple integrations, then you can set the order in which they are executed by clicking the "Reorder:" switch in the upper-right of the configured integrations list and then dragging and dropping the integrations into the desired order of execution, top to bottom.
Creating a New Integration
Click “Configure” to create a new integration.
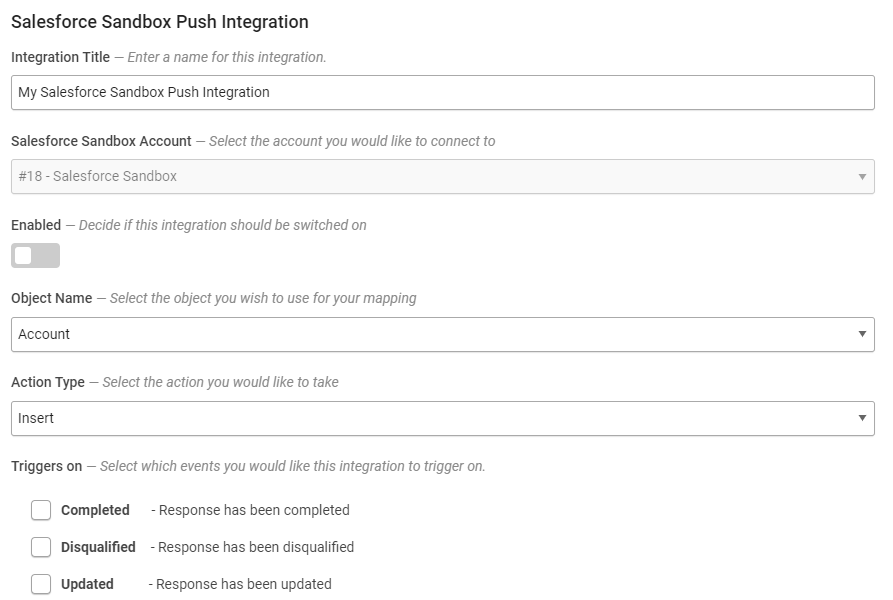
The interface will ask you for a name for your integration, and for you to choose a target Salesforce account or sandbox for it.
Clicking “Continue Setup” will bring up the next stage of integration.
On the setup screen, you can edit the name of the integration, and whether it is enabled or disabled.
Under the Disable / Enable switch, you can choose the object in your Salesforce instance that you want to target.
The "Triggers on" option defines what will cause the integration to sync the survey response to Salesforce. The integration can be set to trigger, or not, when a response is Completed, Disqualified, or Updated.
Choosing an Action
You can choose the specific action that you want the integration to undertake – Insert, Update, or “Upsert”.
Insert – Add a new entry as the chosen object type.
Update – Change an existing record with new data.
Upsert – Change an existing record with new data, unless no existing record is found, in which case a new record will be created.
All of the above will update the fields within the targeted (or new, in the case of insert) object as defined on the “Field Mapping”
Setting up an Insert
When you choose the “Insert” action, you can proceed straight to field mapping.
Setting up an Update
An update action needs to target a specific record to update it. This is defined with the Record ID, which is most easily seen as the alphanumeric code that appears in the URL after the Object name when viewing the record in Salesforce. Salesforce can merge this into emails using its own merge syntax.
When you choose to set up an Update integration, A new option will appear blow the trigger checkboxes where you can define where in the response data this ID can be found. The box heading will change based on your chosen object, so in the example below, it's called "Case ID" as we're targeting the "Case" Object.
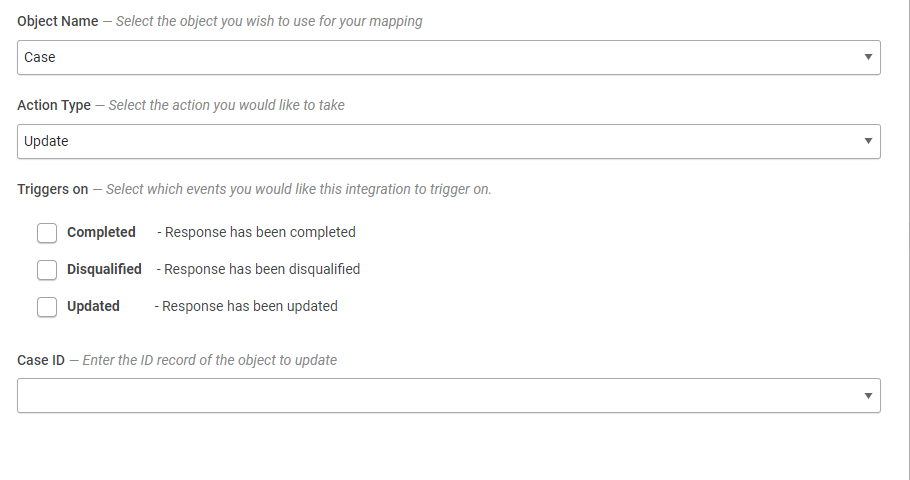
In most circumstances, you’re likely to be using a custom variable or contact list column as the source of this value, but the dialogue allows you complete freedom in how you go about this.
Once set up, choose a Push Trigger.
Setting up an Upsert
Upsert is the most flexible of the options and as such it has the most complex setup.
When Upsert is chosen, you will be prompted to choose an external field and an ID value for that field. This is basically telling the integration A: where to look, and B: what to look for.
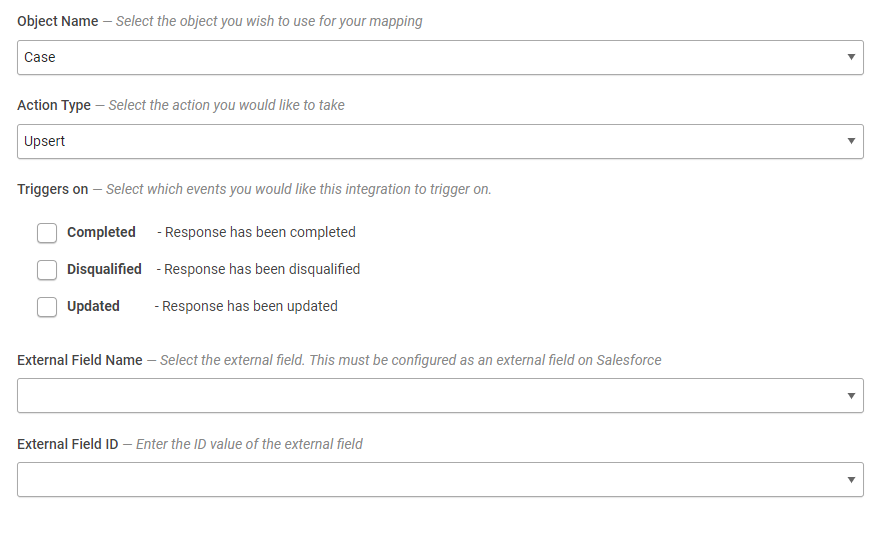
The external field name is chosen from a drop-down list, which will show all the fields set up on the chosen object. You need to ensure that the one you choose is configured as an External ID in Salesforce.
Once you have selected the field name to target, then the second drop-down for External Field ID is where you define the value that is targeted. This works in the same way as the field mapper.
After completing the Fields, choose a Push Trigger.
Note: While Upsert is flexible, it has two important limitations – you cannot search for just anything, only in fields that have been configured as an "external" field. Secondly, you cannot use upsert to change the value that you’re using to identify the record.
Choosing a Push Trigger
Below the action selection fields, there is a section titled "Triggers on".
This is a selection of three checkboxes which set when the integration will actually try and push data to Salesforce.
You can set the integration to trigger when the response is first completed, when the response is edited, or when the response is marked as disqualified (or any combination of the above). Which of these you will want to choose is dependent on the specific purposes of the survey, the integration, and the targeted object.
Note - Using "Trigger on Update" on an "Insert" integration will attempt to create a new record every time the survey response is updated. It will not update an existing record, so be careful when using these options in conjunction.
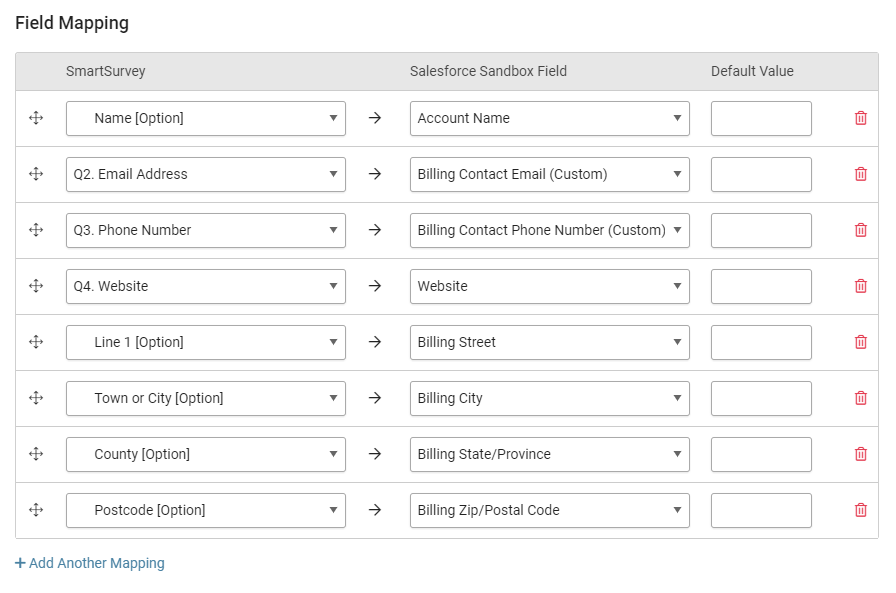
Field Mapping
The field mapping dialogue works in the same way for all three actions.
You can map several fields, but they must all be from the same object.
To map a field, you will need to choose two things. One is the data from SmartSurvey that you wish to send to Salesforce, and the second is where you want to store it in the Salesforce object.
Selecting the SmartSurvey Data:
This is a drop-down menu that works in a similar way to the “Piping” dialogue. When you click on it, you will be able to choose to use any of the following:
- All answers the respondent has given to the survey
- Any Contact list data for the respondent
- Any Custom Variables based in to the Survey via URL
- Various Survey Metadata such as ID, title, etc.
- Custom Value. This allows you to manually set in the value.
This can be static (useful for testing) or uses the same syntax as would be used for piping. To add piped values, click the pencil icon next to the lower field when this is selected and follow the onscreen instructions.
This can be used to combine multiple values into a single field, for instance if your form has separate fields for first name and last name, but your salesforce is set up to have full name as a single field, then you could combine them using this feature, by simply using the piping code for “first name” and then the code for “last name”, separated by a space.
Selecting the Salesforce Field
This drop-down shows all the fields on the targeted object. Simply choose your intended destination for the data.
Mapping More Fields
Once a field has been napped, click "Add Another Mapping" to create a new one, and repeat the process as many times as needed to map everything you need.
Ordering the Field Mapping
You can use the arrow icons to the left of each row of the field mapper to change the order that the the fields appear on screen.
Mapping Multiple-Answer Questions Into Salesforce "Picklists"
Multiple answer questions offer a unique challenge to mapping as the output from SmartSurvey is, by default, a comma-separated list and Salesforce needs lists for the equivalent "picklist" fields to be supplied as semicolon-seperated. This means it's neccessary to use the custom value option to alter the SmartSurvey Output.
- Choose the "Custom Value" option when mapping the question and click the red pen.
- Select the desired question from the "piping" drop-down and click "Insert".
- You will see piping code in the format [question(123456)] appear in the code area.
- Add ":semicolon" after the question ID number in the code area. Example: [question(123456:semicolon)].
Completing the Integration
The Integration should be activated by clicking the "Enable" button.
Once enabled, you will be able to check the status of the integrations on the integrations settings page, including the number of successful and failed events. Clicking the "view details" button for the integration will allow you to see further details.
With this window open, clicking "Events" will show a log of the most recent 250 events, marked as whether they were successful or not. To see the data payload that was transmitted by the event, then click the small question mark icon. This will include any error messages that were returned by a failed event.
Testing and Managing the Integration
By clicking "View details" next to each integration, you can see an overview of how the integration is set up, and an event log.
The Event Log will show the most recent 250 sync events, whether they were completed or failed, along with other information about the event.
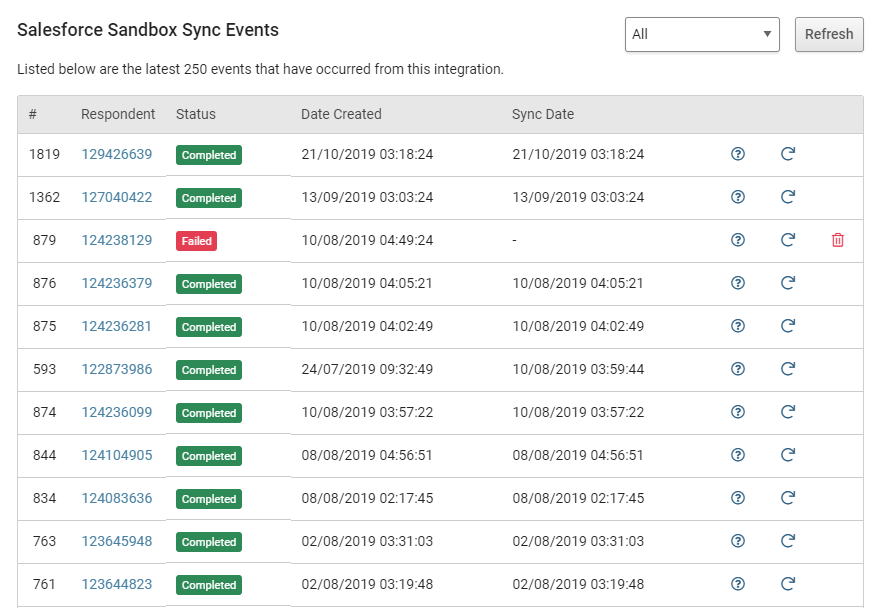
To the right, are two or three icons.
- Question mark in a circle - View or edit event data.
- Circular arrow - Retry event
- Trash bin (only appears for failed events) - Delete event.
Viewing and editing event data
Clicking the circular arrow will retry the event.
The question mark icon will show the request data payload that was sent to Salesforce, and below it the result that was received.
By Default, the request data view is collapsed, but can be expanded by clicking on the small grey triangles.
The result will show any error messages that were received in the event of a failed sync, and other information if successful, such as the ID of a newly-created record in the the event of a successful insert.
You can edit the request data by clicking the "Edit Request Data" button. This will load a dialogue box allowing you to manually amend any of the data sent to Salesforce. Clicking "Save And Retry" will save the changes and retry the sync. Clicking "Save" will just save the changes and if you want to retry the sync, then you can do it using the icon on the list view.
Editing the Event data will not change the data in the survey itself.
Updating the Integration
If you need to make changes to the integration after initial setup, or resume setting up a partially-completed integration, then find the integration you with to update, and click the "Modify" button. This will take you back to the integration configuration, allowing you to change the targeted object, triggers, enable or disable the integration, and access and change field mappings.
Troubleshooting
The UI of the integration is designed so that many possible causes for failure are impossible to set up.
By far the most common reasons for a push to fail are those related to validation. These might be:
- Data doesnt meet validation rules- SmartSurvey doesn't have access to the validation rules set up on the targeted field. So if, for instance, you are trying push data to a field that's set up in Salesforce as a number, and your response data sends it text, the push will fail. Solution - Check Salesforce Validation and set up matching rules on SmartSurvey for that question if possible.
- Mandatory Data Not Present - If you're trying to insert a new record to an object, which has certain fields as mandatory, and that data is not present in the pushed data, the push will fail. Solution - ensure that the appropriate data is part of the survey and is mapped to the mandatory field in the field mapping. If the data is coming from a question, ensure that question is set as required.
- Repeated Data - If the Salesforce object is set to have certain fields contain only unique data (for instance, email address), then if the survey data contains a value for this that is already in the object, the push will fail. Solution - This is more likely to occur intesting than real life, but if this is happening then you may need to re-think what the integration is doing and the action it is using. You may be using an insert when you should be using update or upsert.