Popup invitations (also known as Website Intercepts) allow you to add a survey to a web page that will 'pop up' when visitors are on your website.
Popup invitations are particularly useful for collecting fast feedback on targeted areas of your business, especially when you may not have access to a contact list of respondents. Popups are highly customisable, allowing you to determine categories such as which proportion of visitors to a page are asked to take part, how many page views they need before qualifying, and much more.
Initial Setup
- Click Collect in the blue navigation bar
- Click on Popup Invite at the bottom of the Collect page
- The page opens straight to the Install tab which shows you the code you'll need to add to your website. You can use this straight away and use the popup with all options set to default but for this guide, click Setup in the menu on the left
Note: we suggest you speak with your IT department regarding installing code if they are responsible for managing the code on your website.
Popup Settings
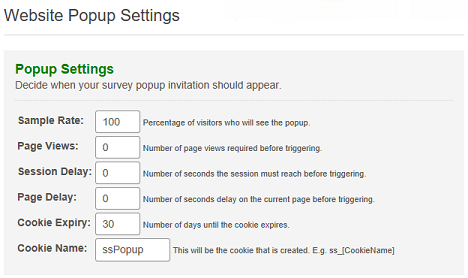
By default, the popup will appear for all visitors the moment they arrive on your website, however, there are a number of settings to control when, and how often, the popup will trigger:
- Sample rate – What proportion of site visitors will trigger the popup
- Page Views – Sets the number of times you require a visitor to view pages with the embedded popup code before the popup can trigger
- Session Delay – Sets the amount of time a visitor must have spent browsing pages on your site before the popup can trigger
- Page Delay – Sets the amount of time a visitor must have spent on a specific page before the popup can trigger
- Cookie Expiry - A cookie is set on the visitor's device once an invitation pops up. While the cookie is present, the popup won’t trigger again. By settinthe number of days for the cookie to expire, you set the time between popups per user
- Cookie Name - The name of the cookie that will be set. If you have multiple popups, we suggest giving each one an individual name
These options can all be used at the same time - for example, you can set the popup to trigger for 50% of users who have spent at least 10 minutes browsing the site and viewed at least 3 pages (bear in mind that the more restrictive the settings, the less data you'll get. You may need to experiment to find a "sweet spot").
Popup Appearance
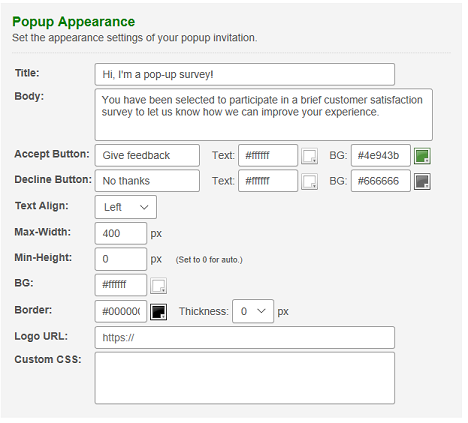
The above screenshot shows the options that allow you to control what the popup looks like (the image at the top of this guide shows the default look and feel).
These are mostly self-explanatory, but a quick guide:
Title - Set the title
Body - Set the main text
Accept Button - Sets the text shown on the button the respondent ticks to take the survey
Text - Set the colour of this text as either as a hex code ("#fffffff") or pick from pallete
BG - Set the colour of the button in the same way as the text above
Decline Button - As per Accept Button, but for refusing the survey
Text-Align - Align text to the left, centre or right
Max-width - Set the maximum width
Min-height - Set the minimum height
BG - Set the main colour
Border - Set a border colour for an outline of the whole popup box
Thickness - Set the thickness in pixels - this is set to zero by default
Logo URL - Add a logo image - this can be added from the file library or elsewhere
Custom CSS - Enter custom CSS to more radically change the look and feel of the popup
Whenever you save a change to these features, you’ll be shown a preview of how the popup will look:
Exit Surveys
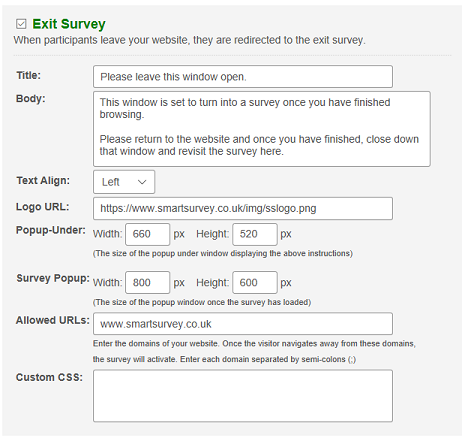
This popup functions as an exit survey. When the visitor ticks the Accept box, a new window is opened as a holding page that the visitor is redirected to once they leave the domains specified in the Allowed URLs box. This way, the visitor can carry on with their interaction on your website with minimal interruption, allowing them to then answer survey questions based on their completed visit.
Tick the box next to Exit Survey which will bring up the Exit Survey section.
Again, these are mostly self-explanatory, but a quick guide:
Title - Set the title
Body - Set the main text
Text-Align - Align text to the left, centre or right
Logo URL - Add a logo image - this can be added from the file library or elsewhere
Popup-Under - Sets the maximum width and height
Survey Popup - Set the minimum width and height
Custom CSS - Enter custom CSS to more radically change the look and feel of the exit survey
Save Changes - Click the green Save Changes button bottom right to take you to the Install Code page
Installing the popup on your website
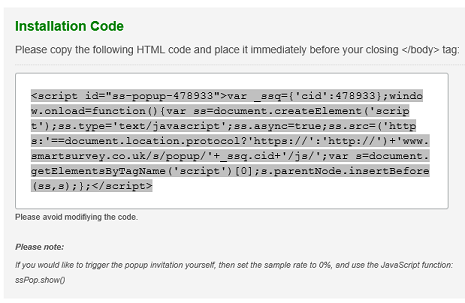
Note: we suggest you speak with your IT department regarding installing code if they are responsible for managing the code on your website.
Clicking on the Save Changes button on the Popup Setup page will take you to the Install Code page; otherwise, select Install from the menu on the left of the Tracking Link Settings page. Copy the HTML code into your page (or pages).